
We’ve seen lots of questions about how to make up the bed in a class B with a folding couch. There are all kinds of great ideas out there, but this is what has worked for us in two different vans. This article shares how we set-up, take down, and store the bedding in our Lexor.

And here’s the same area in daytime mode, converted to a living/dining room.

First we pull out the bed boards, which we store beside the couch, one on each side. That’s the corner of a board peeking out at the end of the couch.

Bed boards go between the ottomans. Then the back cushions fill in over the bed boards. If you want to cover those cushions, buy an extra set of pillow cases, and slip one over each cushion.

Bedding is stored in a hammock which hangs, hidden, behind the couch. Sheets, blanket, and a comforter all fit in the hammock.

A fitted twin sheet covers the couch. It is easiest to get on before extending the couch.

Beth sewed two twin sheets together, after trimming one to make it a little narrower. The bed is a bit wider and a little shorter than a queen.* The seam goes on my side, so Beth doesn’t feel it 😉

With all the sheets and blankets on, we just need to extend the couch.

In our Lexor it only requires holding down a button on the touch screen display.

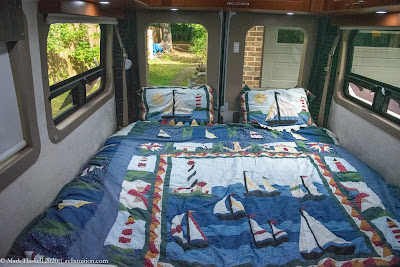
And we have a bed. All that remains to do is pull the pillows out of the pillow shams before we go to sleep.
Morning Routine Putting Bedding Away

In the morning, after starting the water boiling for coffee, we convert the area back to a dining/living room.

The bedding sausage gets put into the hammock. Beth added four snaps to help things stay contained.

The fitted sheet from the couch is the last thing that goes into the hammock.

The hammock is swung back behind the couch to disappear until tonight.

The hammock hooks slip into the holes in the tongues of the seatbelt latches.

The filler cushions get pulled and returned to their use as backrests on the ottomans. Velcro extensions makes it much easier to reattach them and keep the back cushions from ending up on the floor when we are driving down the road.
The bedboards go back into their spots, one on either end of the couch. They could go in the closet, but we’d rather use that room for other storage.

The table and Lagun leg are reattached.


Fitted Ottoman Sheets


The two cushions are different, but it is easy to find space between the blocks to accept the velcro hook strips.

The loop side of the velcro is sewn onto the sheets and the hook side goes on the cushion.

The materials needed were two sets of twin sheets.

Note the label “DW” for Driver’s Window. The two cushions are different as are the two sides of each cushion. Labeling the underside of each fitted sheet avoids confusion when re-installing the sheets after laundry day.
Leave a Reply