Our 3-Way refrigerator was getting harder and harder to light when on propane. It has a “clicker” and it was taking 10-12 tries to get it to ignite.
After hearing other owners say they were seeing propane regulators fail on relatively new vans, we wondered if our regulator might be starting to fail. Not wanting to wait for an appointment and pay a dealer to diagnose the problem, we decided to read and see if we could figure it out ourselves. The best article we found on RV Propane systems was “
What the Pros Do” by Gary Bunzer.* After reading we were ready to see if we could determine if our propane pressure was problematic.
DIAGNOSIS
We wanted to test the Lock-up and Operating Pressure of the propane system, so we needed to acquire a gauge. Never one to pass up an opportunity for new tools, I ordered this Yellow Jacket Gas Pressure Test Kit.
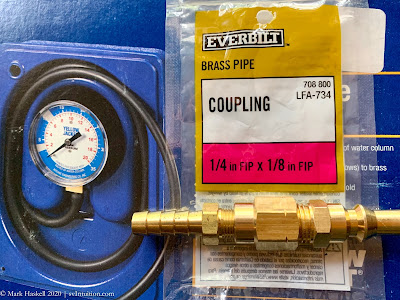
It came with the nipple fitting, but we needed two additional items:
The 1/4″Male NPT
Quick Connect on Amazon fits into the BBQ Quick Connect of the van.
Home Depot had the brass 1/4″ FIP to 1/8″ FIP Coupling to connect the Quick Connect to the nipple fitting. A little yellow teflon tape and the three parts sealed together nicely.
Note: A less expensive, and potentially more accurate method has been used by several Pleasure-Way owners. Here’s a link to one of many videos on how to make your own:
https://youtu.be/QnlfQK-8qy4.
I prefer the simplicity and size of the commercial pressure gauge.
To test the regulator we turned off the propane switch to the solenoid and hooked the gauge into the propane BBQ tap at the rear of our 2018 Lexor TS.
Next we turned on the propane solenoid, before slowly opening the valve* at the BBQ tap to pressurize the gauge.
*Update: January 2023. The valve referenced above isn’t shown in the photo, so here’s a view from the other side showing the valve in the (normal) closed position.
And here’s the valve in the open position needed to get propane to flow to the gauge, bbq, or anything else hooked up to this port. Note that there is nothing hooked up to the port in these two photos. They are just added to show the valve.
The Lock-up Pressure read just above 10 inches of water column, two inches below the recommended 12.
Next we lit the stove burners and started the furnace to find the Operating Pressure. The gauge dropped below 9 inches of water column. Ideally, that should be 11 inches, the middle of the grey area on the gauge.
Note: If you read Gary Bunzer’s article, he made a specific Propane Test Device with an orifice drilled to allow propane to flow at a fixed rate at or above 50% of the flow rate of the RV appliances. Without this device, we ran half the appliances (e.g. the two stove burners and the furnace).
With both the readings below specifications, we decided it was time to inspect the regulator. Unfortunately, the regulator lives under the van inside a protective cover.
The cure for this was, of course, to buy a new tool! Beth ordered this
Endoscope, a camera on a flexible stalk that transmits video or still images to her iPad.
This isn’t really needed, but it is a fun tool to have.
A ventilation hole in the bottom of the bracket that holds the regulator provided a path for the tiny camera.
Looking up from the bottom, it revealed a regulator covered with oil.
Thus ended the diagnosis; we both agreed it was time to replace the regulator.
REPLACEMENT
We actually carry a spare regulator in the van. It is a
Marshall Excelsior MEGR-298 Regulator ordered after attending one of Phil Nickel’s informative tech talks at a Sarasota Pleasure-Way Rally. One other thing Phil recommended was only filling the tank with HD5, the highest quality propane. Check out
Propane 101 for more information on grades of propane.
Learning that others had replaced their regulators, we decided to tackle the project. Several folks from the very active Pleasure-Way RV Group on Facebook lent advice. Special Kudos to Mike Saylor and Cary Alburn for tackling this project before us and sharing their experiences.
This is what we did. I’m NOT recommending that you do this. It would be much safer to take this to a Certified RV Tech who has experience with propane systems. I wanted to do it once at home in case we have to change it when camping in a remote location someday.
Manometer
11mm socket or open end wrenches
#2 Robertson Driver
Box Cutter
Brass Wire Brush
Yellow teflon pipe thread tape
Adjustable crescent wrench
Pliers
CAUTION – We turned off the propane, then ran the stove to remove as much of the propane as possible before working on the lines.
On our 2018 Lexor TS, the regulator is on the passenger side of the built-in propane tank under this plastic protective cover. That’s the output hose you can see emerging from the cover. The supply line is on the opposite end.
The first thing we removed was the supply line where it attached to this elbow.
Next we removed the two plastic rivets by squeezing them from the underside with pliers.
Thirdly, we cut the cover on the molded line. We just did this on the inlet side. It allows the cover to slip off and slide along the outlet line.
Unfortunately there isn’t enough clearance for the cover to lift off and move, so the whole assembly needs to be lowered away from the bottom of the van.
An 11mm socket and open end wrench quickly removed the three bolts and nuts securing it to a sturdy black bracket.
With the assembly loose, we could slide the cover down the outlet hose and finally get a good look at the regulator.
Next we unscrewed the hose on the outlet side of the regulator. A couple of small wrenches did the job.
To completely free the old regulator, four Robertson head screws had to be removed from the back of the bracket. Note that the lower set of holes was used.
The last step, was removing the brass angle fitting from the regulator. I used two small crescent wrenches, one to hold the regulator, and one to unscrew the brass elbow.
And, finally, the regulator was removed.
Note that the “Fairview Gas-Flo” regulator is adjustable. Unscrewing the black plastic cover reveals a slot where a screwdriver blade can fit and adjust the output pressure from the regulator.
Reassembly wasn’t difficult. The new Marshall regulator fit the same hole pattern as the old regulator.
We cleaned the threads with a brass brush before reassembling the connections using yellow teflon gas tape on the threads.
Soapy water is used for leak testing connections.
Once assembled, we hooked up the gauge before turning the gas back on. We performed a three minute test, as described by Gary Bunzer, to make sure the system wasn’t leaking.
The new regulator had a lock-up pressure of 15, quite a difference from 10.
Note: We secured the cover and the regulator assembly to the van before testing it. When we found that the pressure was too high, we had to remove the bracket again so we could slide the cover back over the outlet line and gain access to the regulator. No harm was done, but we could have avoided this by testing once the hoses were safely reattached, before securing the cover and bracket assembly to the van.
The Marshall regulator is also adjustable. Unscrewing, by hand, the black plastic cap revealed a slot in the black plastic ring for a flat screwdriver head.
Beth lit up both burners on the stove and fired up the furnace. About two counter-clockwise rotations had the gauge showing the recommended 11 inches of water column.
With the regulator adjusted, I screwed the cap back on, attached the cover, and reinstalled the three bolts to finish up the installation.
After tightening everything down, I did one more 3 minute test to make sure the system was still leak free.
The fridge and stove now light like they did when the van was new. Our system is pressurized, but we are no longer “under pressure.”
* Sadly, Gary Bunzer, “The RV Doctor” passed away on April 17, 2020 from Covid-19. Read more about Gary’s life
here.


Leave a Reply