
Switching to a SmartPlug
Two years ago we simplified the shore power connection by adding a new locking collar (Power Cord Pain Solved). In that post we mentioned considering the SmartPlug and here we explain why and how to upgrade. While the traditional 30 amp shore power connector works (right), a SmartPlug (left) has several advantages. The SmartPlug clicks positively into position eliminating the need to thread and tighten the traditional round collar. Increased contact area in the SmartPlug blades reduces resistance, minimizing the potential for overheating and fire.

What really convinced us to upgrade is the ease of connection.
Here’s the original power inlet on our Pleasure-Way Lexor. We had to look closely at the plug to align so the one “L”
shaped blade goes fits into the round inlet.

Shaped like a house, instead of a circle, the
Smartplug can only go one way. I can plug it in without looking at
it, even in a dark campsite.

We bought our upgrade kit from TechnoRV, who frequently has them on sale and has excellent installation videos. SmartPlugs are also available from many other retailers, including Defender. Although we bought the “White” version, I’d recommend paying a little more for the Stainless Steel Inlet version on a Pleasure-Way. Pricing at TechnoRV in April of 2021 was $149.99 for white and $174.99 for stainless steel.

Here’s the back of the plug and inlet, along with the cone that aids in getting the old power cord installed into the new plug.

Part 1 – Installing the Inlet
Like most screws on a Pleasure-Way, the four screws that secure the power inlet are square #2 heads. Popular in Canada, the Robertson screws have an interesting history. Every P-W owner should carry three Robertson screwdrivers, or at least the bits, in their rig.

The inlet center on our Lexor, and Plateau before that, has connection points for water, cable, and power, along with the propane switch, in a recessed and covered box.

If you buy one of these, please follow the instructions that come with the SmartPlug. They are well done and will insure that you do things in the proper order. Here are photos of what we did, so you can see that it isn’t a difficult process.

Plenty of slack was provided in the wires so we could pull them out far enough to easily slip off the back cover.

Loosening one screw for each wire allowed the inlet to come free.

Wires then only passed through the back cover. It was released by a screw holding a plastic clamp that secured the wire.

The wires looked like this once they were free. The electrical tape wrap was extra chafe guard provided by Pleasure-Way.

The three wires are inserted into the new SmartPlug inlet. Each hole is color coded to match the appropriate wire color. One screw is tightened for each wire providing a secure metal on metal connection.

The back cover can then be secured with the one included screw, providing strain relief for the wires.

The included foam gasket was secured with a 3M adhesive back. We aligned the four holes in the gasket with the four old screw holes.

The inlet was then attached with the original four screws.

The color matched the service box area nicely, but…

…if doing it again, I’d buy the Stainless Steel version of the inlet. Access is really tight inside the service box of our Lexor. I’m not a big guy and can’t get my finger below the latch to pull open the cover. We worked around it by not latching the cover, but I would recommend buying the Stainless Steel version since it is a bit smaller and offers better clearance.

Part 2 – Installing the Plug

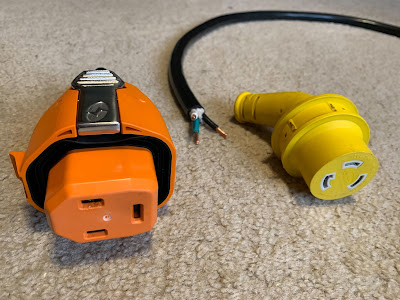
A knife, wire cutters, and wire strippers were all that was needed.

Instructions included a template showing how much insulation to strip off the outside sheath and each wire.

A special cone came with the kit to enable pushing the wires into the back of the new plug.

The cone bundles the wires and is tapered. A little bit of soapy water was added to the cone and old wire.

Once soaped up, I needed a little extra grip to send the wires into the plug assembly. This actually was easier than we expected.

Once inside the housing, the three wires fit into color coded holes, just like on the inlet. Screws held the wires firmly.

The plug then slid into the assembly, making a fine orange and black combination easy to spot and ready for halloween.

The smiling face only needed the addition of a gasket.

Provided with 3M adhesive, the gasket slid over the plug face.

We used a popsicle stick to press down on the gasket. It probably wasn’t necessary as the pressure of the plug going into the inlet would do the same thing.

The completed plug was easy to push into the inlet. A satisfying click was heard as the two clips snapped in, securing the plug. It was easy to release by pushing in on the two stainless steel clips while gently pulling it out.
Leave a Reply